Founder’s Personal Security Checklist, Part 4: Travel and Untrusted Networks
Intro
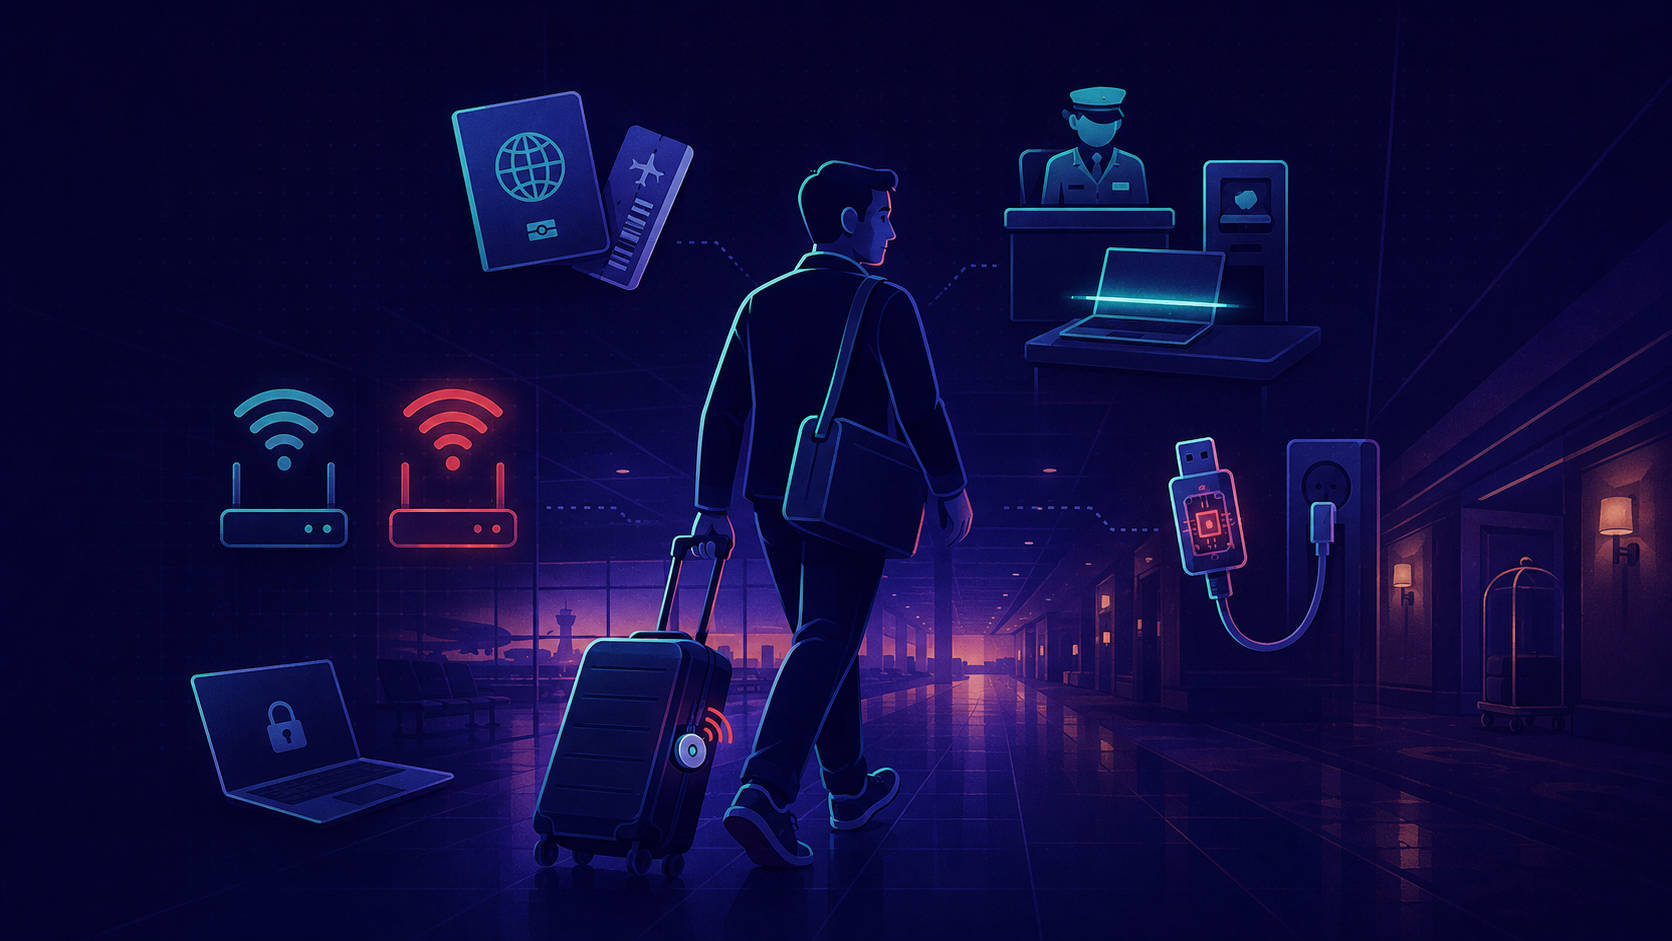
Everything in the previous parts of this series assumed a founder at a desk - identity hardened, phone protected, laptop encrypted. This part is about what happens the moment that desk disappears: the laptop in a customs queue, the phone on a hotel Wi-Fi, the bag in a taxi.
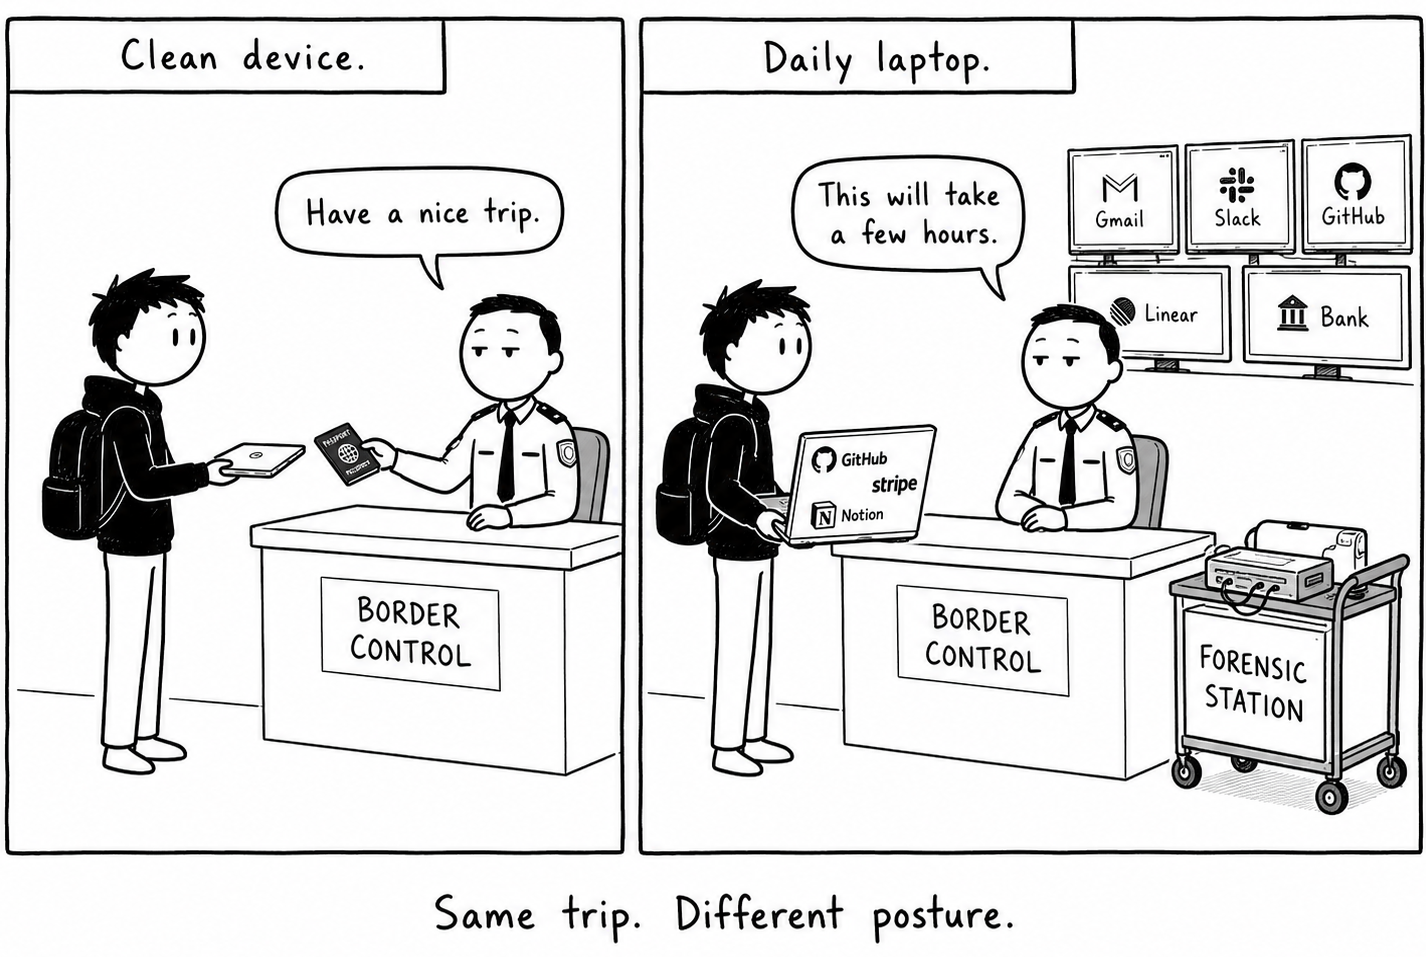
A border officer with ten minutes and your unlocked laptop doesn’t need your passwords - he already has everything you’re signed into. The defenses from earlier parts still hold - encryption, locked screens, all of it. The new problem sits on top of them, and it’s physical and legal, not technical. That’s the part that catches people.
This part covers four layers:
- The travel threat model - what changes, in concrete terms.
- The “clean device” approach - when the extra prep is worth it.
- A practical playbook - pre-trip, at the border, in transit, after.
- Untrusted hardware and untrusted networks - USB, charging stations, hotel Wi-Fi, DNS.
1. The travel threat model
1.1 What changes at the border
When you travel, your threat model changes:
- Border searches - customs officers can inspect (and in some jurisdictions, copy) your devices. Legal frameworks vary; the practical effect is similar.
- Coerced device unlock - at borders or under arrest in many countries you can be legally compelled to provide passwords. Refusing has consequences (denied entry, prolonged detention).
- Hotel room access - physical access while you’re out for dinner. Hotel safes are not actually secure; staff have master codes.
- Untrusted networks - hotel Wi-Fi, conference Wi-Fi, public hotspots all see your unencrypted traffic.
- Targeted theft - a laptop bag in a taxi is a high-value target if the attacker knows who you are.
- Targeted tracking - AirTags and similar devices planted in luggage to map M&A or fundraising routes.
1.2 The legal reality
NB! The 4th Amendment in the United States does not apply at the border. CBP reported 55,318 device searches at ports of entry in fiscal 2025 - up from roughly 47,000 the year before, and almost all warrantless. Several federal circuits have since narrowed advanced (forensic) searches to require reasonable suspicion, but the baseline manual search is still warrantless and routine. Similar regimes exist elsewhere - China, Russia, the UAE among them. Crossing a border puts you under a different legal regime than sitting at home. People forget this, and a few of them have handed over source code at the gate without realizing they could have prepared differently.
2. The “clean device” approach
2.1 When you actually need one
A clean travel device is overhead - separate hardware, prep time before each trip, restoration after. It’s worth it when there’s a realistic chance a government actor - border officers, customs, an intelligence service - will want to see what’s on your devices. This has nothing to do with paranoia. It’s about whether your route or your industry lands you on a screening list in the first place. Plausibility goes up sharply if:
- Your industry intersects with security-sensitive areas (Web3, dual-use tech, journalism, NGO work, sanctioned-region clients).
- Your nationality is politically relevant on the route.
- You carry M&A or fundraising material that competitors or state actors would value.
- You’re transiting through jurisdictions with documented patterns of mandatory device inspection, app installation, or device imaging at the border - notably the United States (routine inspection plus social-media account screening for some visa categories), China (mandatory app inspection at certain land crossings), Russia (broad FSB inspection powers under counter-terrorism law), and the United Arab Emirates (2021 cybercrime law).
2.2 What it means in practice
- Travel laptop - a separate machine that doesn’t store work data. Just enough to do remote work via VPN to your home network. Wiped before the trip, restored after.
- Travel phone - a secondary device or eSIM profile with only the apps you need. No password manager. No persistent crypto wallets. Two-factor codes via an app on your primary phone, which stays home.
- Documents - anything sensitive lives in your encrypted cloud, not locally. Retrieve as needed; clear local copies before crossing back.
For low-risk routes - most intra-EU and intra-APAC business travel - your daily laptop is fine. Follow the basics - disk encryption, screen locked the moment you stand up, no devices left unattended in hotel rooms.
Preparing a clean device costs you an afternoon. Getting your daily laptop imaged at a hostile border costs you everything that’s currently signed into it - which, for most founders, is the entire company.
 Original illustration for DualForce Security.
Pre-trip device prep, country-specific risk briefings (China, Russia, UAE, US border), and post-trip remediation playbooks for founders and executives are part of our Personal Cybersecurity engagement, end-to-end - including custom SOPs for restrictive jurisdictions and high-stakes travel.
3. Practical playbook
3.1 Before the trip
- Sync important files to cloud and verify the backup completed - and that you can access critical documents from a second device.
- Log out of high-stakes sessions you don’t need on the road. Reduce what’s on the device.
- Disable biometric unlock (Face ID, Touch ID, fingerprint) and switch to a long alphanumeric passcode. Biometrics aren’t secrets - an officer can compel a face or finger, but a 12-character passcode is much harder to extract.
- Power the device off completely before any border crossing, not just sleep. Cold-boot state is more resistant to forensic extraction than a sleeping system.
- If you use 1Password, enable Travel Mode and mark only the vaults you actually need on the trip as “Safe for Travel.” Travel Mode hides every vault that isn’t marked safe, so a border inspection sees a much smaller password manager than your real one.
- Carry your YubiKey or MFA token physically separately from the laptop and phone. Different pocket, different bag. A device inspection should not instantly become an account compromise.
3.2 At the border
Don’t over-prepare suspiciously. Don’t wipe the phone at the gate, don’t frantically delete apps or chats in front of officers, don’t fidget. Last-minute cleanup creates exactly the attention you want to avoid. Prep happens before the trip, not at the desk.
Answer only what’s asked. Don’t volunteer additional accounts, backup YubiKeys, admin systems, or recovery methods unless directly required.
3.3 In transit and at the hotel
- Carry critical devices with you, not in the room safe. If you must leave a device, use a TSA-style cable lock and consider a tamper-evident seal on the lid.
- Periodically run a tracker scan on your luggage. iOS warns about unknown AirTags travelling with you, but not always immediately. On Android, use Google’s built-in tracker detection or apps like Tracker Detect.
- On hotel and conference Wi-Fi, use a trusted VPN on every connection. (See Section 5 for the full Wi-Fi/DNS picture.)
NB! Tracking travelling executives with AirTags isn’t hypothetical anymore - there are documented cases. A tracker can be slipped in by a luggage handler, in a taxi, or during a few minutes of hotel bag storage. Usually nobody’s trying to steal the bag. They want to know who you’re meeting and where. So scan during the whole trip, not just on the day you fly.
3.4 After the trip
Treat the device as compromised if any of the following happened:
- Connected by cable to another machine.
- Taken out of your sight, even briefly.
- Rebooted unexpectedly.
- Showed unusual prompts.
- Acquired new apps, profiles, certificates, or VPNs you didn’t install.
Response:
- Wipe and reimage from a known-good backup.
- Revoke active sessions across email, password manager, GitHub, and cloud consoles.
- Rotate credentials that lived on the device - SSH keys, API tokens, VPN certificates.
For routine low-risk trips, this is overkill. For inspection at a high-risk border, it’s the only response that actually resets the trust state.
4. Untrusted USB and charging
4.1 What the attacks look like
A USB port carries power and data over the same pins, and it will also accept whatever peripheral you plug in - including one pretending to be a keyboard. Plugging in anything you didn’t bring yourself is functionally the same as connecting an unverified device to your network.
- Juice jacking. Public charging stations at airports, conferences, hotel lobbies, and even in-flight USB ports look like power outlets, but the same connector carries data. A compromised station can pull files, install malware, or sniff credentials while your phone charges.
- BadUSB. A device that looks like a flash drive but registers as a keyboard, typing malicious commands the instant it’s plugged in. No autorun setting protects you - the device is pretending to be you at the keyboard.
- USB Killer. A device that discharges high voltage through USB pins, physically frying the host laptop in seconds. Cheap, easily acquired, and a documented insider-threat tool.
- Malicious “found” USB drives. At conferences, in hotel lobbies, “accidentally” left in a coworking space. Plugging one in to “see who it belongs to” is exactly the attacker’s plan.
- Compromised cables. The O.MG Cable looks like a standard Lightning or USB-C cable but has a wireless microcontroller built into the plug - it can inject keystrokes, exfiltrate data, and is physically indistinguishable from a real one.
4.2 Keeping ports closed
- Bring your own everything. Your own wall charger, your own cables, your own power bank. Use a wall outlet with your own adapter - not airport USB ports, not hotel desk ports, not borrowed cables.
- Carry USB data blockers. Small adapters (“USB condoms”) that block data pins and pass only power. Cost under $10 - keep one in your travel bag.
- Enable USB Restricted Mode on iPhone. Settings → Face ID & Passcode → USB Accessories: OFF. After about an hour locked, the phone refuses USB data.
- Lock down USB on the laptop. Windows stopped auto-running code from USB drives back in 2011, but the BadUSB class is still wide open by default. A Group Policy that restricts which device classes can be installed (or full Device Control via Intune/MDM) blocks attacker-keyboards outright. On macOS, audit which system and kernel extensions are allowed to interact with new USB devices.
- Never plug in a “found” USB drive. At a conference, hand it to event security. Anywhere else, just leave it where it is - plugging it in to find the owner is exactly what whoever dropped it is counting on.
- For Web3 founders: hardware wallets are USB-connected by design. Only connect them to your dedicated, hardened signing machine - never to a public laptop, a borrowed adapter, or an unknown cable.
NB! “It’s just for charging” is the assumption that gets people. Anything you plug in can present itself as a keyboard or a storage device the moment it connects. I’d treat the port the way you’d treat your front door - you don’t open it to hardware you didn’t bring.
Vetting team-issued cables, chargers, and hardware-wallet workflows - and writing the SOPs that govern what plugs into a founder’s machine - is part of what our OpSec Audit maps and hardens, alongside the human-process gaps from Part 2.
5. Untrusted networks
5.1 Hostile infrastructure
Hotel, airport, conference, and coffee-shop Wi-Fi is infrastructure you don’t control. Every byte of unencrypted traffic is visible to the operator and to anyone running passive sniffing on the same network. Even HTTPS traffic leaks domain names, traffic patterns, and timing - enough to profile what you’re doing.
 Original illustration for DualForce Security.
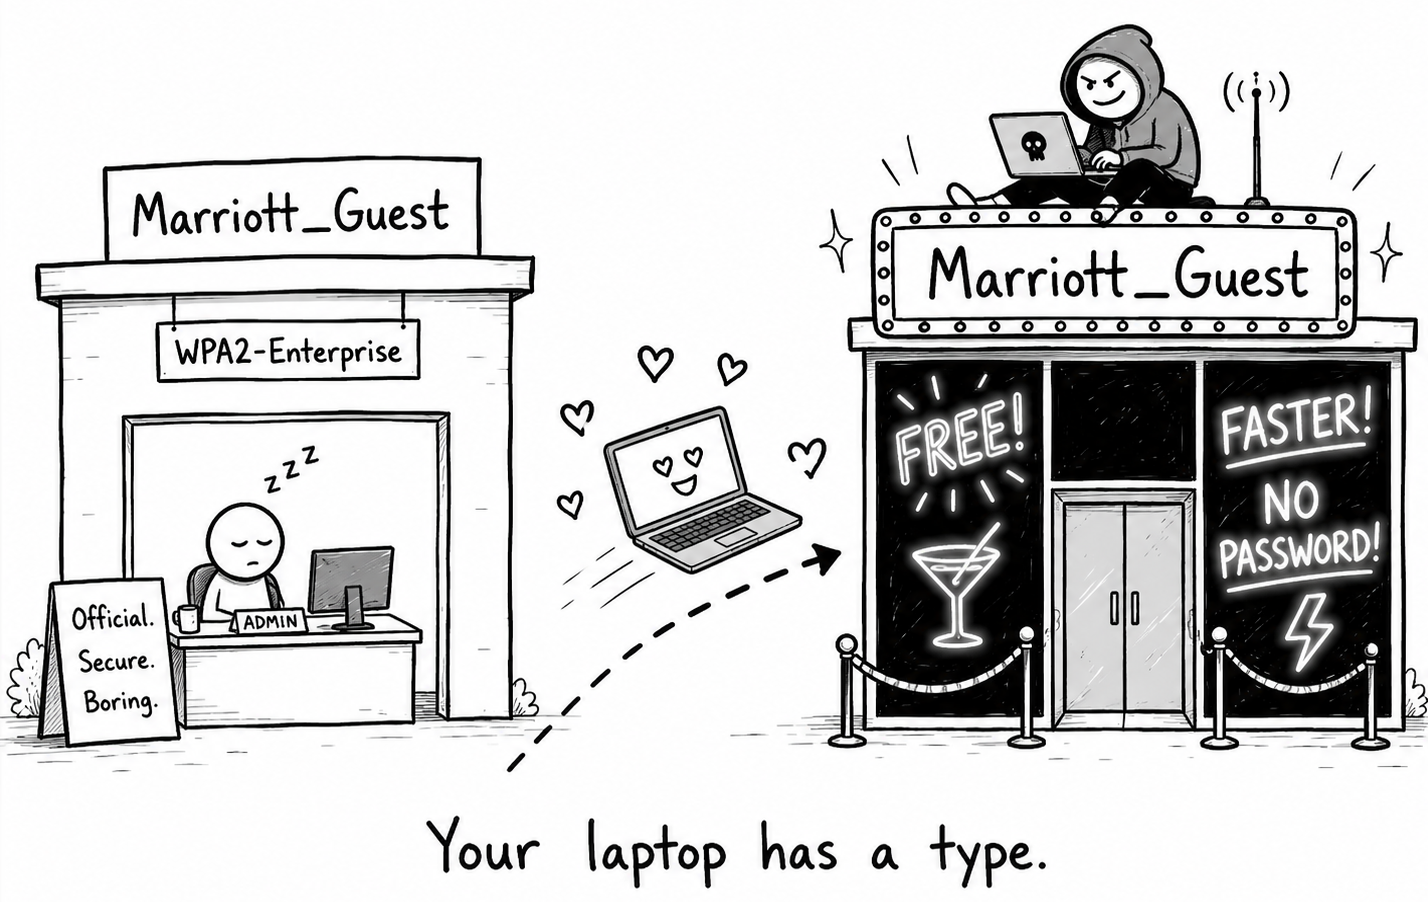
- Evil-twin Wi-Fi. An attacker stands up a fake SSID called “Marriott_Guest” or “Conference_Free” next to the real one. Your laptop, having connected to similar names before, joins it silently. From there: MITM, captive-portal phishing, credential harvesting.
- Captive-portal phishing. The splash page asking for “your email to access Wi-Fi” is a free credential harvest. Attackers replicate hotel-chain captive portals pixel-perfectly.
- DNS hijacking. The network’s DNS resolver returns wrong IPs for the domains you visit. Modern HSTS prevents the worst of this for already-visited sites, but cold visits and apps without certificate pinning remain exposed.
- TLS downgrade and certificate warnings. Attacks that try to strip HTTPS or get you to click through certificate warnings. Click through a TLS warning on hotel Wi-Fi, and the session is compromised.
5.2 Defenses
- VPN on every public network. Mullvad, ProtonVPN, or self-hosted WireGuard. Set it to auto-connect when joining any untrusted SSID. A laptop without VPN on public Wi-Fi is a laptop with no firewall.
- Use your cellular hotspot first. If you have data, tether from your phone instead of joining hotel Wi-Fi. Cellular isn’t perfectly safe (IMSI catchers exist), but it’s a smaller attack surface than open Wi-Fi.
- Enable DNS-over-HTTPS (DoH). Most modern browsers support it natively - Firefox has had it on by default for users in the US since 2020, and in Canada since 2021. Elsewhere you usually have to flip it on yourself, so check rather than assume. At the OS level, use NextDNS, Cloudflare 1.1.1.1, or Quad9 (9.9.9.9) with DoH or DoT. Your DNS queries no longer go through the hotel’s resolver.
- Forget public networks after use. Most OSes auto-rejoin known SSIDs. After a trip, manually remove “Hotel_Free,” “Airport_WiFi,” and similar - otherwise an evil-twin attacker can silently reconnect you days or months later in another city.
- Never click through a TLS warning. If the certificate looks wrong, the network is wrong. Disconnect.
NB! Open Wi-Fi without a VPN is about as private as working next to an open window in a busy cafe - anyone close enough can watch. Nine times out of ten nothing comes of it. The tenth time, you find out after the fact, when there’s nothing left to do about it.
5.3 Restrictive jurisdictions
For travel to restrictive jurisdictions (China, Russia, parts of the Middle East), assume services you rely on daily - Gmail, Drive, Slack, GitHub, some SaaS consoles - may be blocked at the network level. Install and test connectivity tools before arrival, not after.
- The simplest fix is international roaming or a travel eSIM (Airalo, Nomad, Holafly). Traffic routes outside the local network, and most blocked services start working again.
- Prepare at least two VPN backups (ExpressVPN, ProtonVPN, or Surfshark). Any single one can fail, and reliability changes month to month.
- Do not install random local VPN, proxy, or “accelerator” apps on your main device. They see all your traffic, and a malicious or poorly-controlled tunnel creates more risk than it solves.
Designing safe-connectivity playbooks for high-risk jurisdictions - VPN selection, eSIM strategy, DNS resolver hygiene, sanctioned-region workarounds - is what our Awareness Training covers, alongside the team-level rollout.
Conclusion
The defenses for what happens outside your office are mechanical:
- Match device prep to the route. Clean device for high-risk jurisdictions; basic discipline everywhere else.
- Bring your own charger, cables, and power bank. Public USB ports and borrowed cables don’t get a pass.
- VPN on every public network, and never click through a TLS warning.
- Enable 1Password Travel Mode before sensitive trips. Scan for unknown trackers on long trips.
- Forget public SSIDs after use. Evil-twin auto-reconnects don’t expire on their own.
In the next part of this series, we’ll move from devices and networks to communications security and incident response - how to coordinate with your team on Signal safely, what an incident playbook looks like for a small company, and the first 60 minutes after you realise something is wrong.
Stay safe out there. And keep one thing in mind: the most hardened laptop in the world doesn’t help you if the cable plugged into it can type on its own.
Author: Helen S.